React Native is a framework created by Meta that allows you build cross-platform applications targeting Android, iOS, Web, and Desktop for Mac and Windows. React Native provides hot reload functionality, code reuse across multiple platforms, and full access to the native platform including native UI controls. In this blog post we’ll set up our development environment for React Native development and create our first project using Expo.
Let’s get started!
Setting up your development environment
There are two common paths you can follow to setup your React Native development environment, React Native CLI or Expo. Expo currently provides the easiest way to get started with React Native development and where I will focus this blog post. If you want to learn more about using React Native CLI, check out the official documentation here.
Expo provides a suite of tools focused on creating React Native apps. Check out the Expo documentation to learn more, but I want to cover a few highlights:
Expo Go
Expo Go is a free and open-source sandbox you can use for testing and experimenting with React Native on your Android or iOS device. Expo Go can be downloaded from the Apple App Store or Google Play Store and allows you to deploy your app to your device without compiling it or installing a native toolchain. You can learn more about Expo Go here.
Expo Application Services (EAS)
Expo Application Services are cloud services specifically created for Expo and React Native apps. Services include:
- EAS Build – EAS Build provides a service for building app binaries for your Expo and React Native projects.
- EAS Submit – EAS Submit allows you build a binary of your app that is ready to submit to either the Apple App Store or Google Play Store.
- EAS Update – EAS Update allows you to release hot fixes or small enhancements in between app store submissions.
- EAS Metadata (In Beta) – EAS Metadata will allow you to automate and maintain you app store presence from the command line.
- EAS Insights (In Preview) – EAS Insights provides analytics about your project’s performance, usage and reach.
You can learn more about Expo Application Services here.
Expo Prebuild
Previously you had to ‘eject’ from Expo if you wanted to use certain native modules; this is no longer necessary. If you want to use a native module that doesn’t work with Expo, you can create an Expo Prebuild. The Expo Prebuild generates the native code for your project in your local development environment allowing you to work directly with native modules, configurations, etc. You can learn more about Expo Prebuild here.
Prerequisites
Now that we’ve learned a bit about React Native and Expo, let’s make sure you have a few prerequisites installed before we create our first app.
Node.js
Only Node.js LTS releases (even-numbered) are recommended with Expo. You can download a Node.js LTS release here.
Watchman
Watchman watches files and records when they change. It can also trigger actions (such as rebuilding assets) when matching files change. You can download it here.
Git
Use Git for Source Control. You can download Git here.
Creating your first App
To get started open your terminal app, browse to the location you want to create your app and enter the following command:
npx create-expo-app sampleApp -t expo-template-blank-typescript
Let’s break down the arguments of the above command:
npx create-expo-app – This creates the application.sampleApp – This is the name of our application.-t – This tells Expo we want to use a template.expo-template-blank-typescript – This is the template we are going to use.
You can run npx create-expo-app --template to view the different types of templates available.
You may be prompted to install create-expo-app@2.0.x. Go head and install this package.
When your project is successfully created, the following will appear in your terminal:
✅ Your project is ready!

To run your project, navigate to the directory and run one of the following npm commands.

- cd sampleApp
- npm run android
- npm run ios
- npm run web
Next, let’s open the project in your editor of choice (I will be using Visual Studio Code). Open the Terminal in your editor and enter the following command.
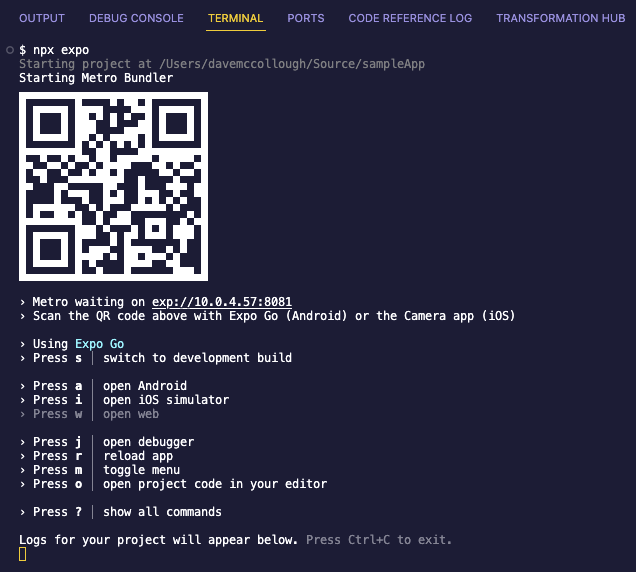
npx expoThis will start your Metro Bundler. If you are using Expo Go, you can scan the QR Code to run the project on your device.

Navigate to the App.tsx file and change the Text component and save the file.
<Text>My first React Native app!</Text>You’ll notice that your app immediately reloads displaying the changes you made in the App.tsx file.

Project Overview
Now that you’ve got your first React Native app up and running, let’s take look at the React Native project.
App.tsx
The App.tsx file is the entry point to your React Native application.
app.json
The app.json file works with the Expo build services and lets you define icons, plugin permissions, etc.
tsconfig.json
The tsconfig.json file is the Typescript configuration file.
package.json
The package.json file includes any project or development dependancies.
assets folder
The assets folder contains all the application assets.
.expo folder
The .expo folder contains Expo generated files.
Run your app on an Android Emulator and/or iOS Simulator
If you want to run your React Native application on an Android emulator or iOS simulator, you can enter a or i from the Metro Bundler Screen to start a simulator. Check out the Expo documentation for further information on setting up your Android Emulator and/or iOS Simulator.
Summary
In this blog post we setup our React Native development environment, created and ran our first app, and learned about the elements of a React Native project.
Thank you for reading!
